Want to add a Dropbox File in Elementor to your WordPress site? It’s a fantastic way to save server space, keep your site fast, and share content smoothly. Whether you’re showcasing a photo gallery, embedding a document, or adding downloadable files, using Dropbox can make your site more efficient and professional.
Today, I’ll explain how to use a Dropbox File in Elementor in two ways: the manual method and a much easier approach using our File Manager for Dropbox plugin (formerly Integrate Dropbox). The manual way works, but can be a hassle, while our plugin makes it a breeze. Stick with me to the end, this will be super helpful!
Why Use Dropbox File in Elementor?
- Save Hosting Space: Store your Dropbox File in Elementor instead of your server to keep your site speedy.
- Easy File Management: Organize files in Dropbox and use them directly in Elementor.
- Versatile Content: Add images, videos, PDFs, or downloadable files to your pages.
- Professional Look: Create galleries, sliders, or file browsers to impress your visitors.
But the way you add these files matters. Let’s look at the manual method first, then see how our plugin simplifies adding a Dropbox File in Elementor.
Option 1: Adding Dropbox File in Elementor Manually
You can add a Dropbox File in Elementor without a plugin, but it’s a slow and tricky process. Here’s how it works and why it’s not ideal.
Step 1: Get a Shareable Link from Dropbox
- Log into Dropbox: Open Dropbox on the web or app.
- Find Your File: Pick the file you want to use (like an image, PDF, or video).
- Create a Link:

- Click Share next to the file.
- Choose Copy Link and copy the URL.
- Edit the link to make it work in Elementor:
- Change
www.dropbox.com to dl.dropboxusercontent.com.
- Replace
?dl=0 with ?raw=1. For example: https://www.dropbox.com/s/abcd1234/photo.jpg?dl=0 becomes https://dl.dropboxusercontent.com/s/abcd1234/photo.jpg?raw=1.
Step 2: Add the File to Elementor
- Open Elementor:
- Go to your WordPress dashboard.
- Edit a page or post and click Edit with Elementor.
- Insert the File:
- For images: Drag an Image widget to your page and paste the modified link in the image URL field.
- For PDFs or videos: Use a Text Editor or HTML widget and add code like
<img src="your-link"> or <iframe> for documents.
- For downloads: Add a Button widget and paste the link as the button’s URL.

- Save and Publish: Check how it looks and hit Publish.
Step 3: Update Files Manually
- If you change a file in Dropbox, you have to make a new link and update it in Elementor.
- Keep track of which links go where—it can get messy fast.
- Test files on different devices to make sure they work (some file types need extra coding).
Why the Manual Method is a Hassle
- Takes Forever: You have to edit links for every single file.
- Easy to Mess Up: One wrong character in the URL, and your file won’t show.
- No Auto-Updates: Change a file in Dropbox? You’re stuck updating links by hand.
- Limited Options: Want a gallery or slider? You’ll need to code it yourself or get another plugin.
- Not Beginner-Friendly: You need some tech know-how to make it work smoothly.
Option 2: Make It Easy with File Manager for Dropbox
Tired of the manual grind? File Manager for Dropbox is here to save you time and stress when adding a Dropbox File in Elementor. This plugin connects your Dropbox account to Elementor, letting you add files with a few clicks—no link editing, no coding, just results. Plus, it comes with cool features like galleries, sliders, and auto-sync.
Why File Manager for Dropbox Rocks
- Super Simple: Pick a Dropbox File in Elementor right from Elementor—no URL tweaks needed.
- Auto-Sync: Update a file in Dropbox, and it updates on your site in 1-3 minutes.
- Awesome Widgets: Add photo galleries, sliders, file browsers, or download links in seconds.
- Works with WordPress: Use Dropbox files in the Media Library like regular uploads.
- No Tech Skills Needed: Everything’s designed for beginners.
How to Use File Manager for Dropbox in Elementor
- Access Your WordPress Dashboard: Log in to your WordPress admin panel.
- Install the Plugin:
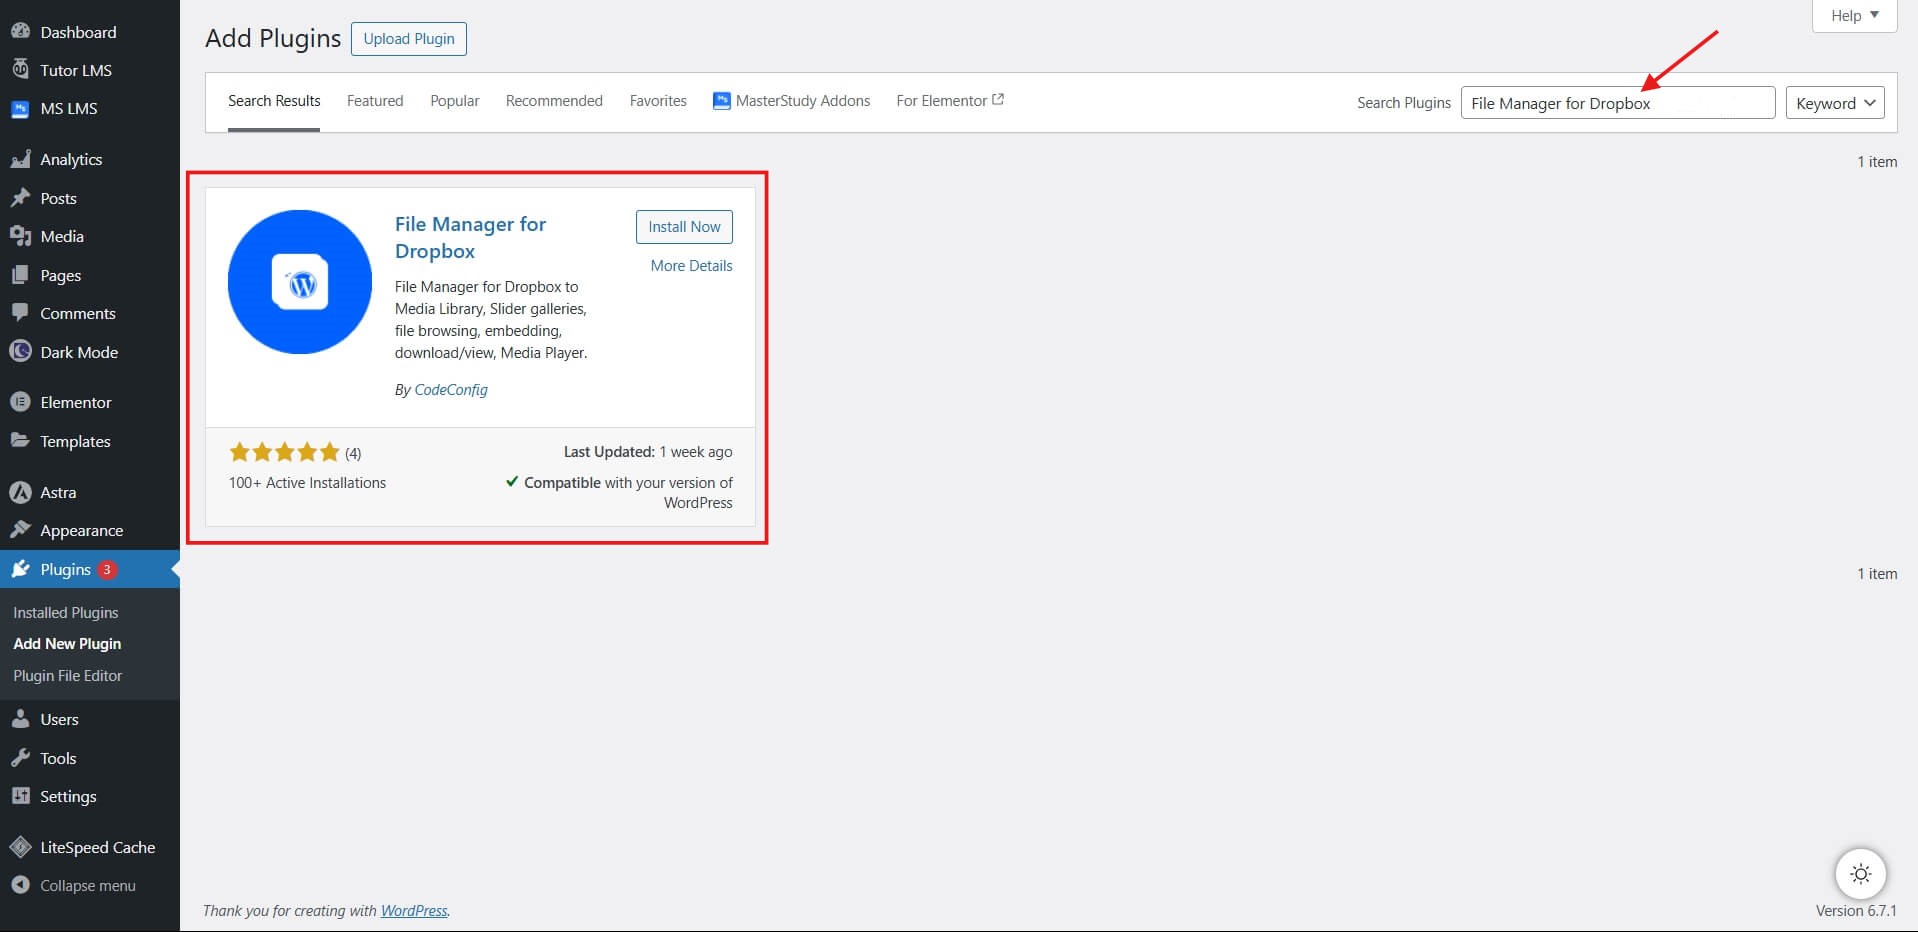
- Navigate to Plugins > Add New.
- Search for “File Manager for Dropbox” in the search bar.
- Click Install Now, then Activate the plugin.

Step 2: Connect to Dropbox
- Locate Plugin Settings: In the WordPress admin menu, select File Manager for Dropbox.
- Configure Dropbox Integration: Follow the setup instructions in the official documentation: File Manager for Dropbox Setup Guide.
Step 3: Enable Elementor and Media Library Support
- Access Integration Settings: Go to File Manager for Dropbox > Settings > Integrations.
- Activate Elementor Support: Check the Enable Elementor Editor option and save changes to access Elementor-specific widgets.
- Enable Media Library Integration: Check the Enable Media Library option and save changes to make Dropbox files available in the WordPress Media Library.

Step 4: Add Dropbox Files Using Standard Elementor Widgets
- Open Elementor Editor:
- Create a new page or edit an existing one in WordPress.
- Click Edit with Elementor to launch the editor.
- Insert Dropbox Files:
- Add a widget such as Gallery, Slider, or Image to your page.
- Click the widget’s image placeholder to open the Media Library.
- Select Dropbox files from the Media Library, preview them on the page, and Publish.

Step 5: Add Dropbox Files Using Dropbox-Specific Widgets
- Launch Elementor Editor:
- Create or edit a page as described in Step 4.
- Locate Dropbox Widgets:
- In the Elementor sidebar, search for “Dropbox” to view available widgets, including:
- Photo Gallery: Display images in a grid with lightbox functionality.
- Slider: Create slideshows for images or videos.
- File Browser: Allow visitors to navigate your Dropbox folders.
- Embed Documents: Display PDFs or Word documents inline.
- Download Links: Provide buttons for file downloads.
- File Uploader: Enable users to upload files directly to your Dropbox.
- Configure a Widget:
- Drag a Dropbox widget (e.g., Photo Gallery) onto your page.
- Select a Dropbox folder or specific files, adjust settings (e.g., grid layout, captions, or lightbox effects), and save.
- Preview and Publish: Review your page in Elementor’s preview mode, then click Publish to make it live.
Step 6: Explore Advanced Features (Optional)
- Shortcodes: Use the plugin’s Shortcode Builder to create custom galleries or download links, then insert them using Elementor’s Shortcode widget.
- Media Library Integration: With Media Library support enabled, use Dropbox files for blog posts, featured images, or other WordPress content.
- WooCommerce Integration: Manage product images or downloadable files directly from Dropbox for WooCommerce stores.
How File Manager for Dropbox Saves the Day
- No More Link Hassles: Pick a Dropbox File in Elementor directly—no editing URLs.
- Fast and Easy: Add galleries or sliders in minutes, not hours.
- Stays Updated: Files sync automatically, so your site always shows the latest versions.
- Beginner-Friendly: No coding or tech skills needed—just drag, drop, and done.
- Tons of Options: Create anything from file browsers to download buttons with zero fuss.
Cool Features You’ll Love
- Save Server Space: Keep files in Dropbox to make your site faster.
- User Folders: Give each user their own Dropbox folder for personalized access.
- Matches Your Site: Customize colors and styles to fit your brand.
- Works with Gutenberg: Use 7 blocks for file management in the Block Editor.
- Form Uploads: Save Elementor form submissions straight to Dropbox.
Quick Tips for Success
- Organize Your Files: Use clear folder names in Dropbox to find files fast.
- Keep Files Small: Compress images or videos for quicker page loads.
- Check Mobile: Test galleries or sliders on phones to make sure they look great.
- Secure Your Files: Use Dropbox permissions to control who sees what.
- Update the Plugin: Check for updates to get new features and fixes.
Wrapping Up
Adding a Dropbox File in Elementor manually is a pain—tons of steps, easy mistakes, and no auto-updates. But with File Manager for Dropbox, it’s a breeze. This plugin lets you add files, galleries, sliders, and more with just a few clicks, all while keeping your site fast and organized. Whether you’re a beginner or a pro, it’s the easiest way to integrate a Dropbox File in Elementor.
Ready to simplify your workflow? Grab File Manager for Dropbox from WordPress.org and start building better pages today!
Got questions? Drop them in the comments or check out our support page for help!


Written By
Ahanaf Istiyad
Hey, I'm Istiyad! As a UI/UX and product designer, I’m passionate about building sleek, user-friendly experiences that make navigating digital products feel effortless and fun!
Express Your Opinion